I have been working on Macs my entire professional career and have found them to be wonderful for content creation due to their easy use, simple design and usually problem free operation. It was no issue for me then to select GarageBand to record and edit my podcast for two main reasons; (1) it has great features that are MADE for podcasting and (2) it’s free with a Mac!
I’m not going to list all of the nooks-and-crannies of how GarageBand works since the white-sheets for the program are extremely simple to understand. I will, however, explain the step-by-step process of recording, editing and exporting an audio podcast with GarageBand and mention some pitfalls.
Organizing your files
Using GarageBand will mean that you will be producing at least two different files for each of your podcast episodes; (1) your actual GarageBand project file that is used for saving and editing your podcast and (2) your exported audio file ready for distribution. Personally, I like to place all of my GarageBand project files in a folder titled “GarageBand” and all of the exports into a folder named “Episodes”. Right now, the Ask Adam League distributes episodes primarily, but for other content that is different than an episode I like to save those files in a different folder.
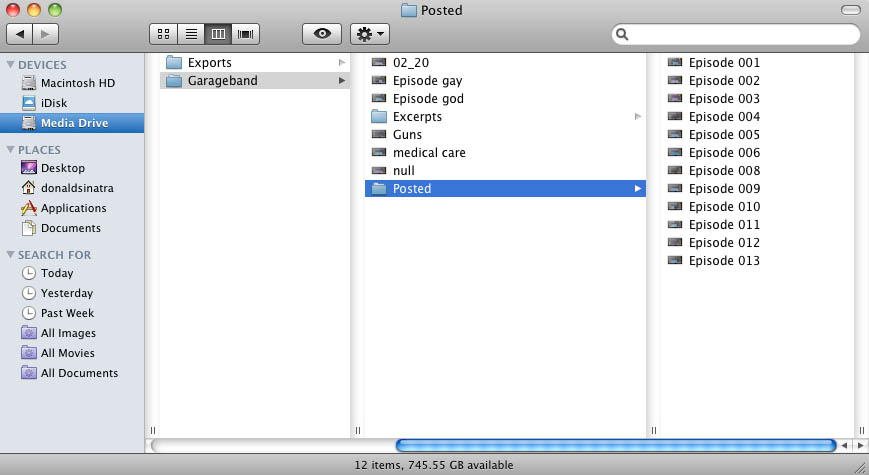
This organization is critical because the more content you produce, the more files you are going to have to sift through if (and when) you have to go back. This was the case with the Ask Adam League when we began moving our episodes over to YouTube. All of the GarageBand files needed to be accessible so we could re-export them to an AAC format for video distribution. So just make sure that whatever system you use, you develop something that works for you and is future-proof.
One last tip for file organization in GarageBand. I like to use a template project file so I am setting the parameters and effects for the recording only once. This helps save time and create consistency between episodes. The easiest way to do this is to save a GarageBand project file that is your master template with all of the saved parameters. Open this file each and every time you record a new episode. When you are done recording select File>Save As in the pulldown menu and save a new project file.
Recording
GarageBand is a very simple program, as many Apple produced applications are, and it’s even easier for people who have experience in video or audio editing. I’ll go through the basic process of recording on GarageBand.
The first thing you need to do when beginning to record for GarageBand is set up a template project that will be your standard recording project that can be duplicated and saved for all of your podcast episodes.
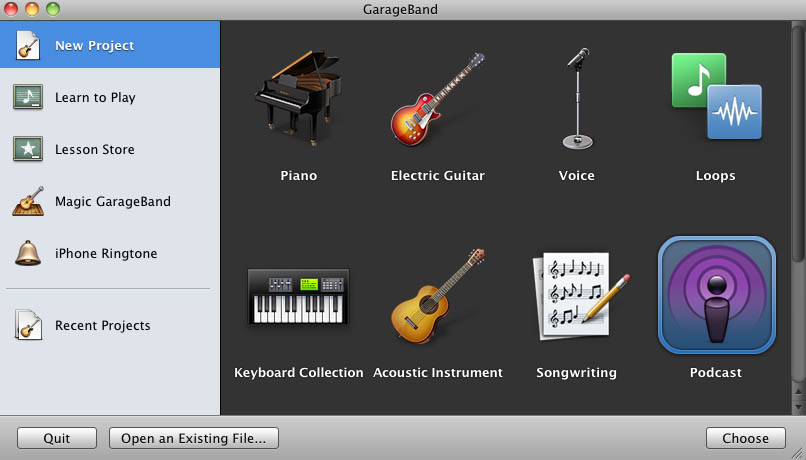
Open GarageBand, select File>New in the pulldown menu, select New Project>Podcast and select “Choose”.
You will be prompted to name your GarageBand project file (the extension is .band) and a location on your hard drive to save the file. Don’t worry about the tempo, signature or key parameters at the bottom.
A brand new project will be opened and ready for podcast recording. There will be a few things that you would like to change before recording at this point however.
Make sure to name your tracks according to who they will be assigned to. I always assign Adam to the first track and myself to the second. Just click the name field and you’re on your way to editing the name.
It’s time to do some alterations to your tracks. GarageBand will put certain parameters at default.
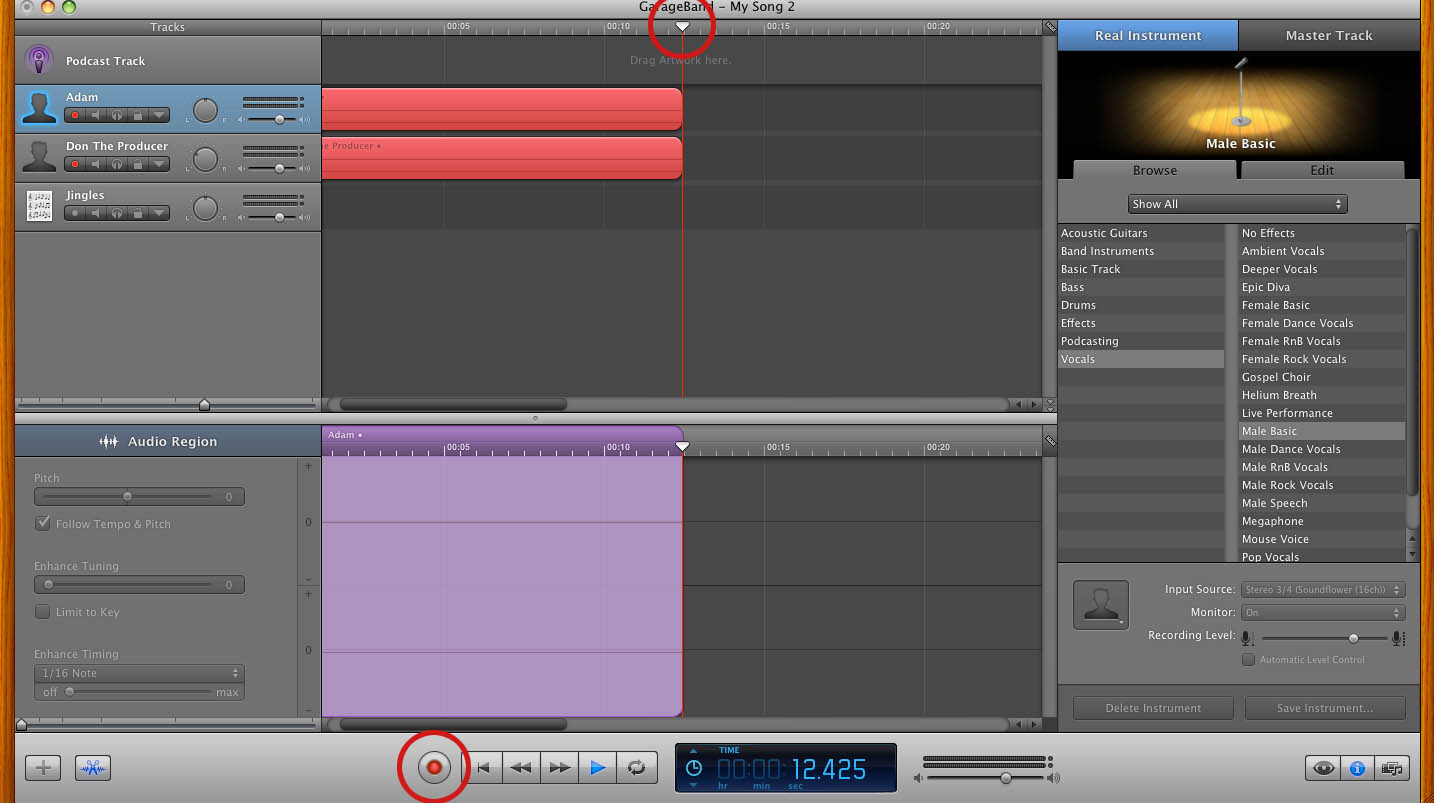
Highlight the track you want to edit and select the “I” or information button at the bottom right of the software to reveal track info. Make sure that the “Browse” tab is activated as well. You are ready to edit your selected track. Select the Input Source pulldown to whatever device you will be using (mainly a microphone but you can do several things like record with other people over Skype which I will mention in a later post). For the best audio recording scenario you will want to select the input for each of your talent so you can have separate recordings on each track. It makes it a LOT easier to edit in post. Monitor basically indicates whether you want to actually hear the sound from that particular track in your monitoring device (speakers or headset). For a simple two person podcast you will want to turn the monitor “on” for anyone you want to hear and “off” for the track that is assigned to the operator of the software. Recording level is the level which the track is recorded at. Also, you can select different icons if you want to be cute. I certainly don’t need a female icon representing me on the second vocal track.
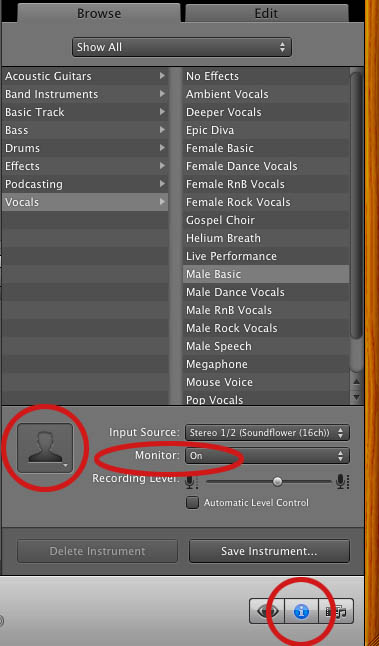
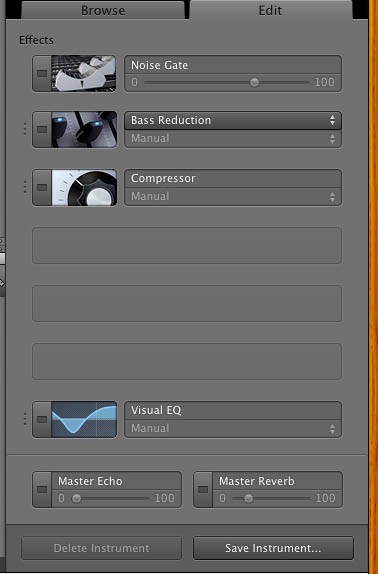
GarageBand applies some filters to the tracks by default that will need to be adjusted. To change these, click the “Edit” tab to activate the edit functions. Both the male and female tracks will have effects applied to each with varying differences within each effect. The difference between the effects in the male and female vocals are significant so make sure that you adjust the effects if you use them in your final mix. I turn off ALL of these effects during recording by clicking their respective blue buttons. You can have these filters active while recording and it will make no difference in the raw recording if you have them active or not; I like to have naked audio coming in and know that I will be able to adjust them later.
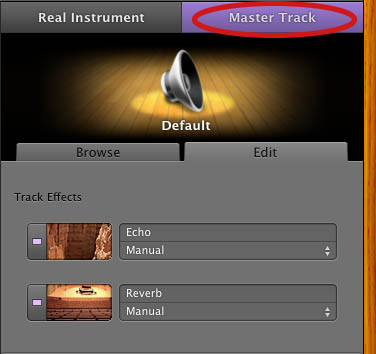
The Master Track, which defines any adjustments to all the tracks also has some setting by default. Highlight the “Master Track” tab at the top right of the interface and you will see the activated Track Effects in the “Edit” tab. You can go ahead and turn these off.
Rinse and repeat for both (or more) vocal tracks.
Ducking is an audio effect where selected tracks can be dominant or be submissive to other tracks. The best example is talk radio when the host is talking over a caller. The caller’s audio suddenly drops automatically when the host is speaking. “Up” means the track has precedence over the others and “Down” means that the track is submissive and will “duck” out it’s audio. I turn all these off in recording but you can leave them on if you wish.
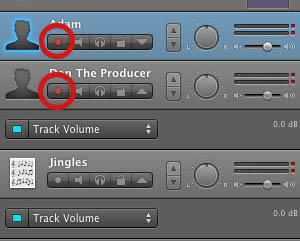
Lastly, you are going to want to enable recording for the tracks that you want to be recorded. This is done by clicking the “enable recording” button. If it’s red then the track will be recorded.
After that all you need to do is set your playhead to the location that you want to record at and then hit the big red record button.
Editing
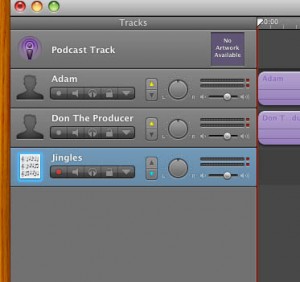
Editing is extremely simple in GarageBand. The setup above describes a two person audio recording with separate channels allowing for the best audio editing scenario. Separate channels means that audio effects and editing can be isolated to each source. Two other tracks exist; the podcast track at the top (this is only necessary for advanced podcasts which is beyond the scope of this post) and a jingle track. The jingle track is a track where you can import music of your own or from the GarageBand sound library. I recommend that if you want music in your podcast that it be inserted in post so you can control the audio level, fade-ins and fade-outs.
There are several ways to edit sound in GarageBand and all of them can be found in the manual, however, I will explain in brief a few principles that are the most used. If you want to chop the ends off of tracks or simply split a track, place the playhead over the section you want to make a split, select the channel you wish to split and pres “command + T” or you can use Edit>Split in the pulldown menu. This will split the clip and allow you to trim the clips using the drag points at the end.
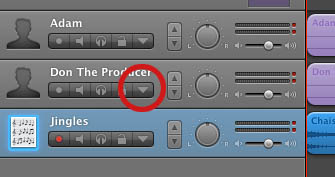
There will also be the time where you will need to adjust the volume levels of certain tracks over time. Say that you start with a significant level of your jingle track and you want to ramp it down when the voice of the talent comes in. GarageBand allows you to keyframe the volume level over time for individual tracks. To do this click the downward triangle below the track name, this is the automation button.
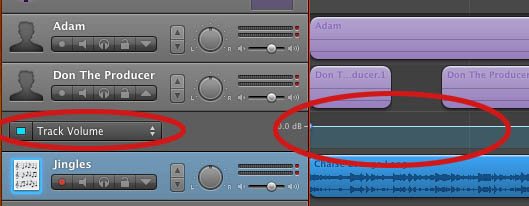
By default, the Track Volume function will be available. (There is a pulldown for track pan as well but we’ll just focus on the volume level). Click the grayed out button to the left of the Track Volume indicator and the key-frameable volume control band will appear in blue.
Now you can easily ramp up and down the volume control for any track. Just click on the blue line to create a keyframe which can be used as a node to control the volume over time. From this image you can see that the volume of the jingle track comes in strong and then dips down lower (but not fully out) as the talent’s track comes up to intro the show. After a bit, the jingle track slowly fades out.
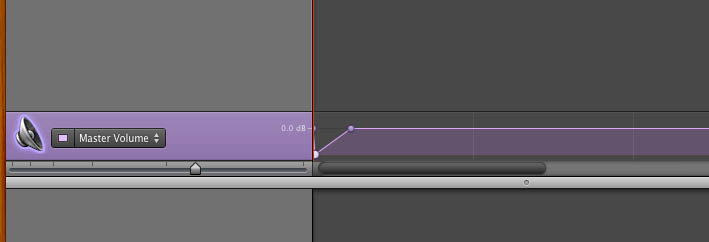
To adjust the overall volume of the audio in your project, you can enable the Master Track by going to Track>Show Master Track in the pulldown menu. You can adjust the volume with key-framing just as the individual tracks.
Exporting
Exporting a podcast is very simple. There are two types of exports that you can do (1) is for a standard audio podcast and (2) is for an advanced podcast which has chapter and image capability (I will cover this in another post).
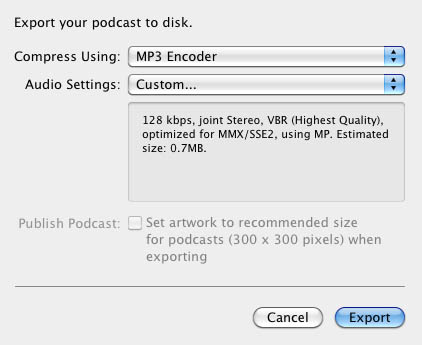
For exporting a standard podcast click Share>Export Podcast to Disk in the pulldown menu. A prompt will appear for setting the exporting parameters.
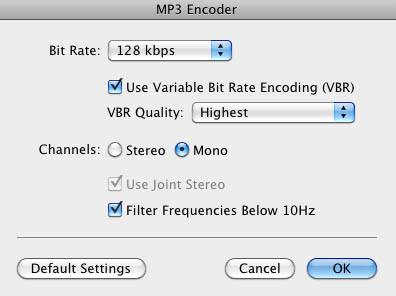
The Ask Adam League is a half hour all vocal podcast, except for some bookended music, so it doesn’t need to have a high end sampling rate. For an all vocal podcast of this length, what’s worked for me is going with the MP3 encoder and 128 VBR. Any compression that is taking place is practically unnoticeable at this bit rate and compression algorithm.
On the Compress Using pulldown, select MP3 Encoder. For the Audio Settings select “Custom”. You’ll have another prompt come up. 128 kbps (kilobytes per second) is just fine for a vocal podcast, anymore is just overkill unless you have a lot of music on your podcast and supreme quality is needed for that music. I always go with VBR quality as the “Highest”. Variable Bit Rate will automatically adjust the bits per second on the encoding of your podcast based on the “like” sound around it. CBR or Constant Bit Rate will have the same bit rate all the way through the podcast. So if you have VBR set as “Highest” like I do, GarageBand will automatically adjust the bit rates throughout your podcast saving space on your hard drive, your server and will make for quicker downloads for your listeners. For Channels, set it to “Mono” unless you have a LOT of music on your podcast and you really need your listeners to hear the nuances of the left and right channels of a song. But for a spoken podcast all you need is mono. It will help cut down on the size of your file as well. I always check Filter Frequencies Below 10Hz to knock out any annoying low-end sound that might be around. But I haven’t noticed a difference between it being enabled or not.
Pitfalls
- Make sure that your record indicator is red when recording on ALL the tracks you want recorded. If not, then you wont be recording everything.
- Save regularly! A system crash, program freeze, user error or any number of problems can occur and if you’ve spent some time cutting your project without saving then you can set yourself back a lot of time. Save right after you are done recording as well.
- Test record before you do your master record; every time. You’d hate yourself if you started recording and realized that the talent or host’s mic wasn’t recording or there is some other issue at hand.
- Make sure your audio is consistent between all of your channels. If your host is considerably louder than your talent, then your listeners will have a hard time focusing on your content.


Keep on writing, great job!
My web site the cat language bible
Ahaa, its nice discussion regarding this piece of writing
at this place at this webpage, I have read all that, so now me also commenting
here.
My homepage; Amy
I am just waiting for summer season to must be any day A
single factor I am a lot more positive of is that this
next phase will delight Mini, effectively the getting in the nip element that is.
Her new favourite issue is to jump off the toilet mid education and run around the residence, starkers from the waist down.
Here is my web site … Potty training video for toddlers to watch uk
Outre les bagages de cabine d’avion à fermeture
homologuée TSA, ceux avec des serrures à codes sont également très pratiques.
Elle se compose d’un fer et d’un réservoir produisant la vapeur, également
appelé chaudière, et d’une capacité comprise généralement entre
1 l et 1,5 l. La qualité de la centrale va dépendre
de la pression de la vapeur produite qui est calculée
en bars, ainsi que de son débit calculé en grammes /
minute.
I love it whenever people get together and share ideas.
Great site, keep it up!
great issues altogether, you simply received a new reader.
What may you suggest about your post that you just made some days ago?
Any certain?
my web page: healthy choice garcinia cambogia bbb (Johnie)
It’s remarkable in support of me to have a site, which is useful designed for my
know-how. thanks admin
Here is my web blog … garcinia cambogia mi az
Amazing! This blog looks just like my old one! It’s
on a totally different topic but it has pretty much the same page layout and design. Great choice of colors!
We’re a gaggle of volunteers and starting a new scheme in our community.
Yoour site provided us with useful info to work
on. Youu have done a formidable task annd our whole group will be grateful to you.
Look into my homepage: donald
Há muitos complicadores na sincronização de flashes com câmeras digitais.
Com guia carro com isenção,além desse passo a passo que é prova
de falhas, você também vai aceitar todos os documentos para acabar com a
procura e também facilitar mas ainda seu processo. http://explorecorporation.id/halkomentar-142-37871.html
Superb post but I was wondering if you could write
a litte more on this topic? I’d be very grateful
if you could elaborate a little bit further. Cheers!
As I website possessor I conceive the content material here is very excellent,
appreciate it for youir efforts.
Here is my website: Is Essayfactory.Uk Legit
I like the valuable information you provide in your articles.
I’ll bookmark your blog and check again here regularly.
I’m quite sure I’ll learn plenty of new stuff right here! Good luck for the next!
Here is my web page – garcinia cambogia austin texas (Brent)
I blog often and I really thank you for your content. This great article has really peaked my interest.
I’m going to bookmark your blog and keep checking for new
details about once per week. I subscribed to your Feed as well.
my website garcinia cambogia best results
great put up, very informative. I’m wondering why the opposite experts of this sector don’t understand this.
You must proceed your writing. I am sure, you’ve a huge readers’
base already!
Also visit my web blog – garcinia cambogia approved by fda
(Sammy)
Hi there, just became alert to your blog through Google, and
found that it is really informative. I’m gonna watch
out for brussels. I will be grateful if you continue this in future.
Many people will be benefited from your writing. Cheers!
Here is my web-site – garcinia cambogia azione (Cora)
I have been absent for some time, but now I remember why I used to love this web site.
Thank you, I’ll try and check back more often. How frequently you update your site?
Excellent pieces. Keep posting such kind of info
on your site. Im really impressed by it.
Hello there, You’ve done an excellent job.
I’ll definitely digg it and in my opinion recommend
to my friends. I am confident they’ll be benefited from this
website.
whoah this weblog is excellent i love studying your posts.
Keep up the great work! You know, lots of individuals are
hunting around Products for arthritis this information,
you could aid them greatly.
Wow, this article is good, my sister is analyzing these
things, therefore I am going to inform her.
Feel free to visit my blog – Arthritis pain relief
When I originally commented I clicked the “Notify me when new comments are added” checkbox and
now each time a comment is added I get four e-mails
with the same comment. Is there any way you can remove me from that
service? Thanks!
My web page; Silver pro
I needed to thank you pagan jewelry for men this very
good read!! I certainly enjoyed every little bit of it.
I have you book-marked to look at new stuff you post…
Whats up are using WordPress for your blog platform?
I’m new to the blog world but I’m trying to get started and set up
my own. Do you require any coding knowledge to make your own blog?
Any help would be really appreciated!
Also visit my site Silver pro
I got this web page from my pal who told me about this
site and at the moment this time I am visiting this web page and reading very informative articles or reviews
at this time.
My blog: Wrist pain
Fastidious replies in return of this question with
firm arguments and describing the whole thing about that.
Here is my webpage :: Technology
Right now it looks like BlogEngine is the preferred blogging platform available right now.
(from what I’ve read) Is that what you are using on your blog?
I constantly spent my half an hour to read this web site’s
articles or reviews all the time along with a mug of
coffee.
Here is my homepage: Wrist pain
Amazing! Its really amazing post, I have got much clear
idea regarding from this article.
Here is my web page … Carpal tunnel treatment
Thanks for sharing your info. I truly appreciate your efforts and I will be waiting for your further
write ups thanks once again.
my blog post :: Arthritis products
It’s difficult to find knowledgeable people about this subject, however, you sound like
you know what you’re talking about! Thanks
Also visit my blog; Wrist pain
Hi, I do think this is an excellent site. I stumbledupon it 😉 I will revisit once again since I saved as a favorite it.
Money and freedom is the greatest way to change, may you be rich and continue to help
others.
Here is my blog; Compretion band
Its such as you read my thoughts! You seem to grasp a lot approximately this, like you wrote the book in it or something.
I feel that you simply could do with a few p.c. to pressure the message home a bit, however other than that, this is excellent blog.
A great read. I’ll definitely be back.
Excellent goods from you, man. I have understand your stuff previous
to and you are just extremely excellent. I really like what you have acquired here, really like what you’re saying and the way in which
you say it. You make it entertaining and you still take care of to
keep it smart. I can not wait to read far more from you.
This is actually a tremendous website.
my page :: spiritual shop
Amazing! This blog looks just like my old one! It’s on a totally different subject but it
has pretty much the same page layout and design. Outstanding choice of colors!
Here is my site: Carpal tunnel pain relief
Hey there! This post could not be written any
better! Reading through this post reminds me of my previous room mate!
He always kept chatting about this. I will forward this article to him.
Fairly certain he will have a good read. Thank you Products for arthritis
sharing!
You’re so interesting! I do not believe I’ve read through something like that before.
So wonderful to find someone with unique thoughts on this topic.
Really.. thanks for starting this up. This web site is something
that is required on the internet, someone with a bit of originality!
Look into my blog: buy recruitment solutions
Good day! This post couldn’t be written any better!
Reading this post reminds me of my old room mate! He always kept talking about this.
I will forward this article to him. Pretty sure he will have a good
read. Thanks Products for arthritis sharing!
Thanks for the good writeup. It in reality used to be a enjoyment
account it. Glance complex to far added agreeable from
you! By the way, how can we communicate?
Here is my web page Wrist pain
I have read soo many content on the topic of the blogger lovers however this post iis rdally a nice post, keep it up.
Also visijt my blog post :: Gaziantep Escort _ Gaziantep Escort Bayan
I really like your writing style, superb info, thanks for putting up :
D.
Hi there! This blog post couldn’t be written much better!
Looking at this article reminds me of my previous roommate!
He always kept preaching about this. I will send this article to him.
Fairly certain he’ll have a very good read. Thanks for sharing!
My website: construction jobs
Yes! Finally someone writes about Gadgets.
my web blog; Technology news
I like the helpful information you provide
in your articles. I will bookmark your weblog and check again here frequently.
I am quite sure I will learn many new stuff right here!
Best of luck for the next!
My website :: Arthritis pain relief
I’d like to thank you for the efforts you have put in penning this blog.
I am hoping to view the same high-grade blog posts by you in the future as well.
In truth, your creative writing abilities has encouraged me to get my own,
personal blog now 😉
my weblog: garcinia cambogia advice (Lynn)
Hey very interesting blog!
my web-site … hire helps (Luz)
After checking out a handful of the blog posts on your website,
I really like your way of writing a blog. I book marked it to my bookmark
site list and will be checking back soon. Please check out my website too and tell me
your opinion.
Also visit my site :: finance jobs
Just desire to say your article is as amazing.
The clearness to your put up is just nice and that i could suppose you’re knowledgeable on this subject.
Fine together with your permission let me to seize your feed
to keep updated with drawing close post. Thank you 1,000,000 and please carry
on the gratifying work.
my blog post; Tech news today
Asking questions are really pleasant thing if you are not understanding anything
totally, however this paragraph presents nice understanding even.
Look at my web site; Carpal tunnel pain relief