I have been working on Macs my entire professional career and have found them to be wonderful for content creation due to their easy use, simple design and usually problem free operation. It was no issue for me then to select GarageBand to record and edit my podcast for two main reasons; (1) it has great features that are MADE for podcasting and (2) it’s free with a Mac!
I’m not going to list all of the nooks-and-crannies of how GarageBand works since the white-sheets for the program are extremely simple to understand. I will, however, explain the step-by-step process of recording, editing and exporting an audio podcast with GarageBand and mention some pitfalls.
Organizing your files
Using GarageBand will mean that you will be producing at least two different files for each of your podcast episodes; (1) your actual GarageBand project file that is used for saving and editing your podcast and (2) your exported audio file ready for distribution. Personally, I like to place all of my GarageBand project files in a folder titled “GarageBand” and all of the exports into a folder named “Episodes”. Right now, the Ask Adam League distributes episodes primarily, but for other content that is different than an episode I like to save those files in a different folder.
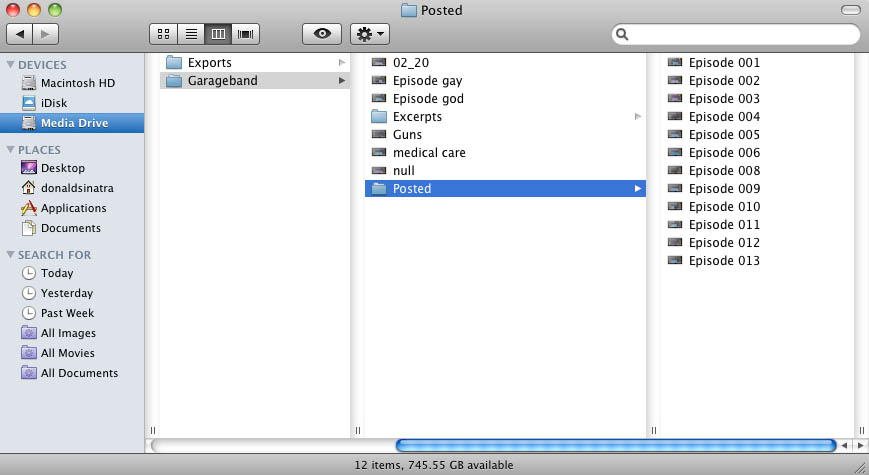
This organization is critical because the more content you produce, the more files you are going to have to sift through if (and when) you have to go back. This was the case with the Ask Adam League when we began moving our episodes over to YouTube. All of the GarageBand files needed to be accessible so we could re-export them to an AAC format for video distribution. So just make sure that whatever system you use, you develop something that works for you and is future-proof.
One last tip for file organization in GarageBand. I like to use a template project file so I am setting the parameters and effects for the recording only once. This helps save time and create consistency between episodes. The easiest way to do this is to save a GarageBand project file that is your master template with all of the saved parameters. Open this file each and every time you record a new episode. When you are done recording select File>Save As in the pulldown menu and save a new project file.
Recording
GarageBand is a very simple program, as many Apple produced applications are, and it’s even easier for people who have experience in video or audio editing. I’ll go through the basic process of recording on GarageBand.
The first thing you need to do when beginning to record for GarageBand is set up a template project that will be your standard recording project that can be duplicated and saved for all of your podcast episodes.
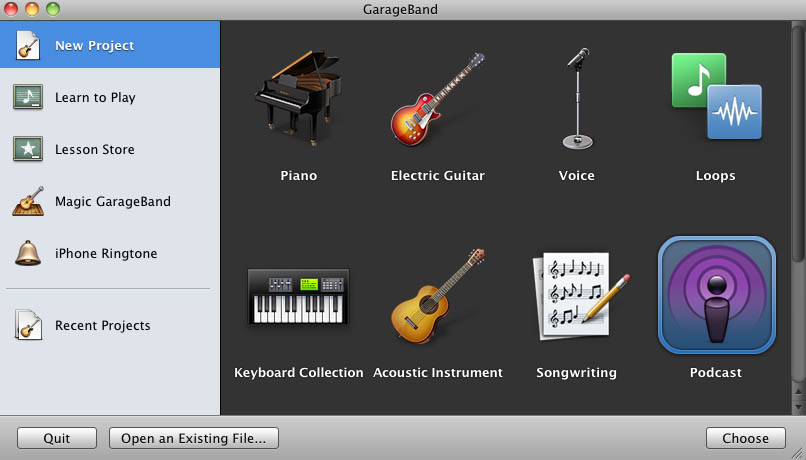
Open GarageBand, select File>New in the pulldown menu, select New Project>Podcast and select “Choose”.
You will be prompted to name your GarageBand project file (the extension is .band) and a location on your hard drive to save the file. Don’t worry about the tempo, signature or key parameters at the bottom.
A brand new project will be opened and ready for podcast recording. There will be a few things that you would like to change before recording at this point however.
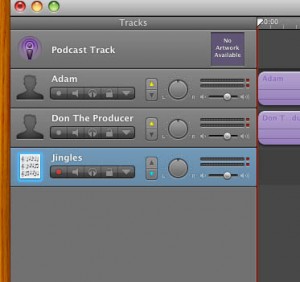
Make sure to name your tracks according to who they will be assigned to. I always assign Adam to the first track and myself to the second. Just click the name field and you’re on your way to editing the name.
It’s time to do some alterations to your tracks. GarageBand will put certain parameters at default.
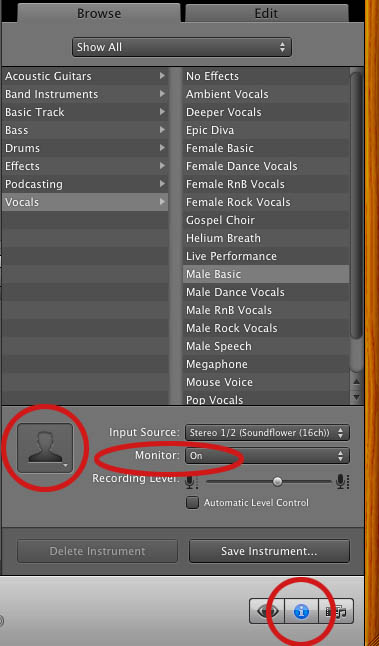
Highlight the track you want to edit and select the “I” or information button at the bottom right of the software to reveal track info. Make sure that the “Browse” tab is activated as well. You are ready to edit your selected track. Select the Input Source pulldown to whatever device you will be using (mainly a microphone but you can do several things like record with other people over Skype which I will mention in a later post). For the best audio recording scenario you will want to select the input for each of your talent so you can have separate recordings on each track. It makes it a LOT easier to edit in post. Monitor basically indicates whether you want to actually hear the sound from that particular track in your monitoring device (speakers or headset). For a simple two person podcast you will want to turn the monitor “on” for anyone you want to hear and “off” for the track that is assigned to the operator of the software. Recording level is the level which the track is recorded at. Also, you can select different icons if you want to be cute. I certainly don’t need a female icon representing me on the second vocal track.
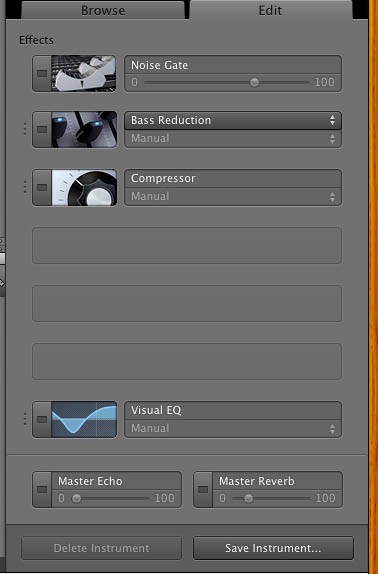
GarageBand applies some filters to the tracks by default that will need to be adjusted. To change these, click the “Edit” tab to activate the edit functions. Both the male and female tracks will have effects applied to each with varying differences within each effect. The difference between the effects in the male and female vocals are significant so make sure that you adjust the effects if you use them in your final mix. I turn off ALL of these effects during recording by clicking their respective blue buttons. You can have these filters active while recording and it will make no difference in the raw recording if you have them active or not; I like to have naked audio coming in and know that I will be able to adjust them later.
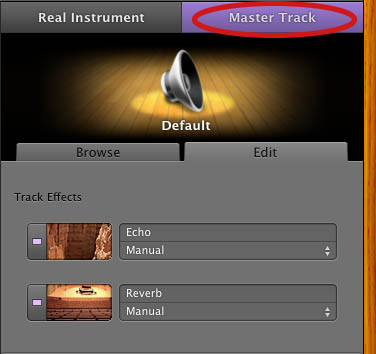
The Master Track, which defines any adjustments to all the tracks also has some setting by default. Highlight the “Master Track” tab at the top right of the interface and you will see the activated Track Effects in the “Edit” tab. You can go ahead and turn these off.
Rinse and repeat for both (or more) vocal tracks.
Ducking is an audio effect where selected tracks can be dominant or be submissive to other tracks. The best example is talk radio when the host is talking over a caller. The caller’s audio suddenly drops automatically when the host is speaking. “Up” means the track has precedence over the others and “Down” means that the track is submissive and will “duck” out it’s audio. I turn all these off in recording but you can leave them on if you wish.
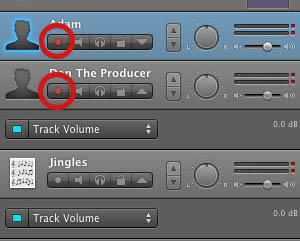
Lastly, you are going to want to enable recording for the tracks that you want to be recorded. This is done by clicking the “enable recording” button. If it’s red then the track will be recorded.
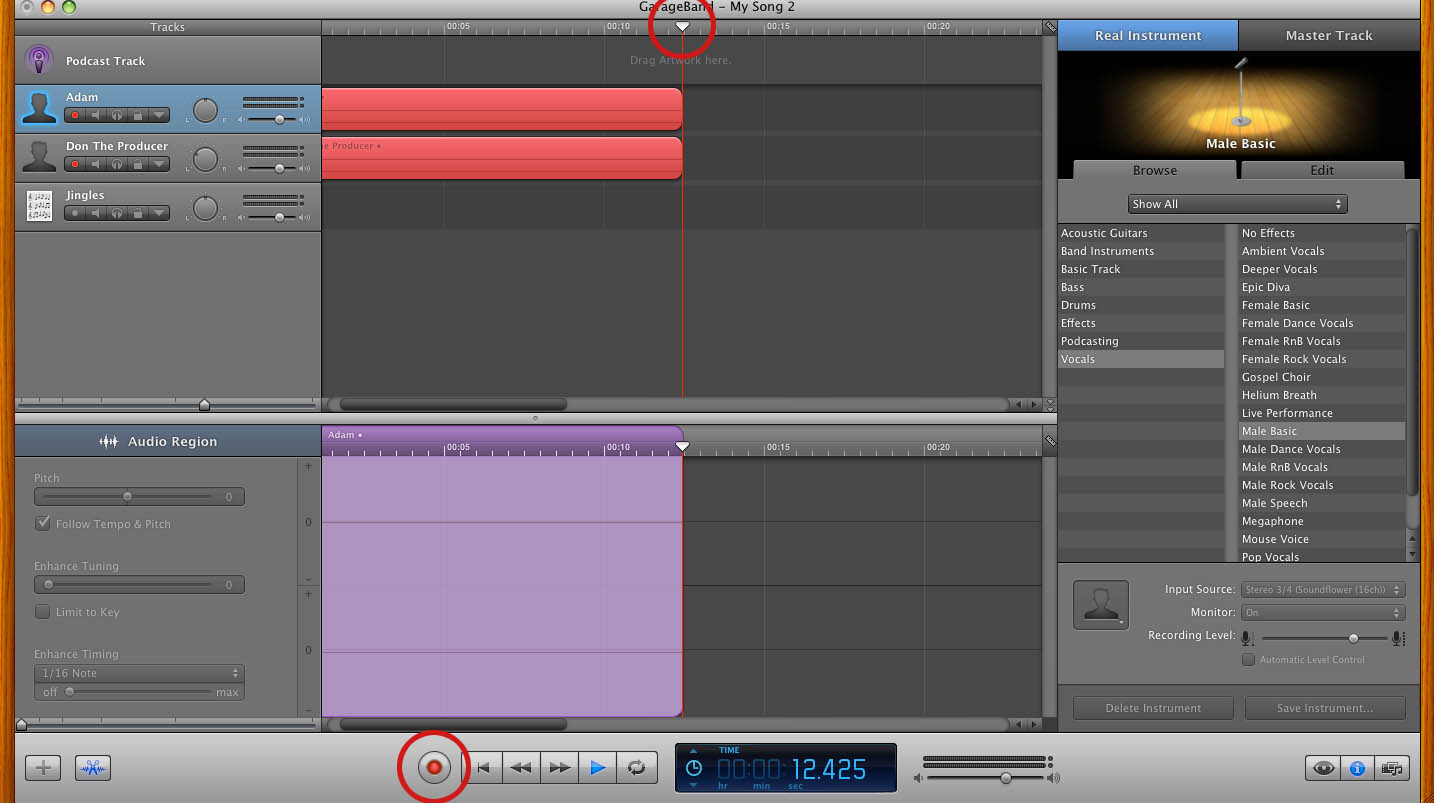
After that all you need to do is set your playhead to the location that you want to record at and then hit the big red record button.
Editing
Editing is extremely simple in GarageBand. The setup above describes a two person audio recording with separate channels allowing for the best audio editing scenario. Separate channels means that audio effects and editing can be isolated to each source. Two other tracks exist; the podcast track at the top (this is only necessary for advanced podcasts which is beyond the scope of this post) and a jingle track. The jingle track is a track where you can import music of your own or from the GarageBand sound library. I recommend that if you want music in your podcast that it be inserted in post so you can control the audio level, fade-ins and fade-outs.
There are several ways to edit sound in GarageBand and all of them can be found in the manual, however, I will explain in brief a few principles that are the most used. If you want to chop the ends off of tracks or simply split a track, place the playhead over the section you want to make a split, select the channel you wish to split and pres “command + T” or you can use Edit>Split in the pulldown menu. This will split the clip and allow you to trim the clips using the drag points at the end.
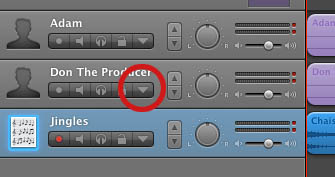
There will also be the time where you will need to adjust the volume levels of certain tracks over time. Say that you start with a significant level of your jingle track and you want to ramp it down when the voice of the talent comes in. GarageBand allows you to keyframe the volume level over time for individual tracks. To do this click the downward triangle below the track name, this is the automation button.
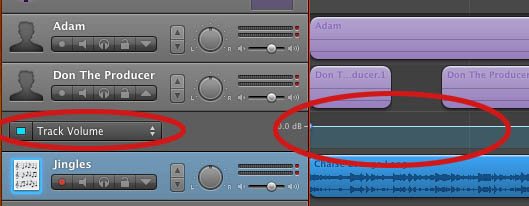
By default, the Track Volume function will be available. (There is a pulldown for track pan as well but we’ll just focus on the volume level). Click the grayed out button to the left of the Track Volume indicator and the key-frameable volume control band will appear in blue.
Now you can easily ramp up and down the volume control for any track. Just click on the blue line to create a keyframe which can be used as a node to control the volume over time. From this image you can see that the volume of the jingle track comes in strong and then dips down lower (but not fully out) as the talent’s track comes up to intro the show. After a bit, the jingle track slowly fades out.
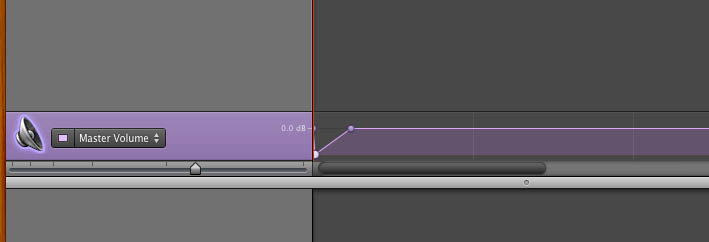
To adjust the overall volume of the audio in your project, you can enable the Master Track by going to Track>Show Master Track in the pulldown menu. You can adjust the volume with key-framing just as the individual tracks.
Exporting
Exporting a podcast is very simple. There are two types of exports that you can do (1) is for a standard audio podcast and (2) is for an advanced podcast which has chapter and image capability (I will cover this in another post).
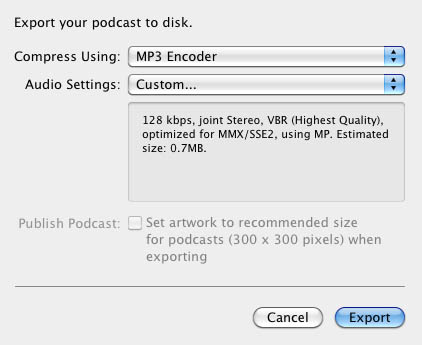
For exporting a standard podcast click Share>Export Podcast to Disk in the pulldown menu. A prompt will appear for setting the exporting parameters.
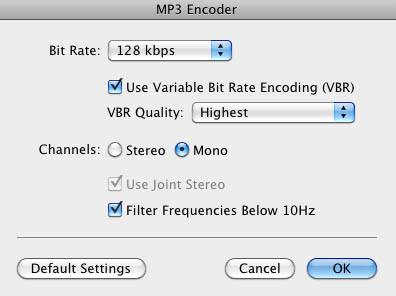
The Ask Adam League is a half hour all vocal podcast, except for some bookended music, so it doesn’t need to have a high end sampling rate. For an all vocal podcast of this length, what’s worked for me is going with the MP3 encoder and 128 VBR. Any compression that is taking place is practically unnoticeable at this bit rate and compression algorithm.
On the Compress Using pulldown, select MP3 Encoder. For the Audio Settings select “Custom”. You’ll have another prompt come up. 128 kbps (kilobytes per second) is just fine for a vocal podcast, anymore is just overkill unless you have a lot of music on your podcast and supreme quality is needed for that music. I always go with VBR quality as the “Highest”. Variable Bit Rate will automatically adjust the bits per second on the encoding of your podcast based on the “like” sound around it. CBR or Constant Bit Rate will have the same bit rate all the way through the podcast. So if you have VBR set as “Highest” like I do, GarageBand will automatically adjust the bit rates throughout your podcast saving space on your hard drive, your server and will make for quicker downloads for your listeners. For Channels, set it to “Mono” unless you have a LOT of music on your podcast and you really need your listeners to hear the nuances of the left and right channels of a song. But for a spoken podcast all you need is mono. It will help cut down on the size of your file as well. I always check Filter Frequencies Below 10Hz to knock out any annoying low-end sound that might be around. But I haven’t noticed a difference between it being enabled or not.
Pitfalls
- Make sure that your record indicator is red when recording on ALL the tracks you want recorded. If not, then you wont be recording everything.
- Save regularly! A system crash, program freeze, user error or any number of problems can occur and if you’ve spent some time cutting your project without saving then you can set yourself back a lot of time. Save right after you are done recording as well.
- Test record before you do your master record; every time. You’d hate yourself if you started recording and realized that the talent or host’s mic wasn’t recording or there is some other issue at hand.
- Make sure your audio is consistent between all of your channels. If your host is considerably louder than your talent, then your listeners will have a hard time focusing on your content.


I like it whenever people get together and share thoughts.
Great site, continue the good work!
Look into my webpage: flagstone
I was curious if you ever considered changing the page layout of your website?
Its very well written; I love what youve got to say.
But maybe you could a little more in the way
of content so people could connect with it better.
Youve got an awful lot of text for only having one or two images.
Maybe you could space it out better?
Feel free to surf to my webpage – http://www.studium-berater.de/studentenfluege/
You are aware what your skin look e cigarette for your
family. And if you know the best situation to buy e-health electronic cigarettes
you are located in luck. First need determine where your next order
of e-liquid shall come produced by. All you have to do is go online before you take out and have them ship it for.
I blog frequently and I genuinely appreciate your information. This article has
really peaked my interest. I am going to bookmark your website
and keep checking for new information about once a week.
I subscribed to your Feed as well.
Take a look at my web blog :: http://www.privatdetektiv-werden.de/detektei-frankfurt/
Tactical flashlights are commonly included in guns as well
firearms. Is actually to assist the users find target in dim materials.
This will then help the user target better as it illuminates the mark.
I’d like to find out more? I’d care to find out more details.
my homepage … kemetic science prosperity
If you to be able to play war strategy games for free you can visit online game sites.
They have a variety of free and easy perform war games which can be enjoyed by
children and adults of all ages.
Fifth couple up was Niecy Nash and Louis Van Amstel dancing on the cha cha.
Niecy was full of energy, however the performance was quite stagnant.
Niecey lost her concentration throughout the dance.
Spot on with this write-up, I absolutely think this website needs a lot more attention.
I’ll probably be returning to read more, thanks for the advice!
Check out my webpage: Implant Dentures
Its such as you read my mind! You seem to grasp a lot approximately this, such as you wrote the e-book in it or something.
I feel that you just could do with some p.c. to
power the message house a bit, but other than that,
that is great blog. A fantastic read. I will definitely be back.
Review my page: http://www.privatdetektiv-werden.de/detektei-hamburg/
hello there and thank you for your info – I’ve definitely
picked up anything new from right here. I did however expertise several technical points using this site,
as I experienced to reload the web site lots of times previous to I could get it to load
properly. I had been wondering if your web host is OK? Not that I am complaining, but slow loading
instances times will sometimes affect your placement in google
and can damage your high-quality score if advertising and marketing with Adwords.
Anyway I’m adding this RSS to my e-mail and could look out for
a lot more of your respective interesting content. Make sure you update this again very soon.
my web-site :: http://www.horrorfilmfans.de/game-of-werewolves-die-jagd-beginnt/
It’s perfect time to make a few plans for the longer term and it’s time to be happy.
I’ve learn this post and if I could I wish to recommend you some
attention-grabbing issues or suggestions. Maybe you can write next articles referring to
this article. I wish to read even more things
about it!
Feel free to visit my site … http://www.computer-sicher-machen.de/bilder-im-internet-hochladen-und-bearbeiten/
I loved as much as you will receive carried out right here.
The sketch is tasteful, your authored material stylish.
nonetheless, you command get got an shakiness over that you wish
be delivering the following. unwell unquestionably come more formerly again as exactly the same nearly very often inside case you shield this hike.
Here is my homepage … raise money
I would’t need to tell you about the importance of video inside your marketing strategy.
So if we are on the same wavelength might attach some
importance to video production costs.
Thank you for the auspicious writeup. It in fact was a amusement account
it. Look advanced to more added agreeable
from you! By the way, how could we communicate?
my homepage – http://www.exzurueck.net/freundin-zurueckgewinnen/
A motivatÑ–ng discussion is worth comment. I do think that you need
to write more about this subject matter, it may not be a taboo matter but typically people don’t talk abß‹ut these topics.
To the next! Óany thanks!!
my homepage; teen titans go full episode
Hi there friends, pleasant paragraph and nice urging commented at this place, I am in fact enjoying by these.
Check out my webpage: Safe Plumbing
What’s up Dear, are you really visiting this site on a regular basis, if so then you will without doubt obtain good experience.
Good site you’ve got here.. It’s hard to find good quality
writing like yours these days. I really appreciate people like you!
Take care!!
I am sure this piece of writing has touched all the internet users, its really really good
piece of writing on building up new web site.
My website … Chrinstine
What’s up Dear, are you really visiting this web page on a regular
basis, if so afterward you will absolutely obtain good knowledge.
Also visit my website :: Guide to dental implants
Thanks designed for sharing such a pleasant thought, article is
fastidious, thats why i have read it entirely
Feel free to surf to my webpage – http://www.haarausfall-beseitigen.de/haarausfall-behandeln/
Howdy! This is kind of off topic but I need some guidance from an established blog.
Is it tough to set up your own blog? I’m not very techincal but I can figure things out pretty quick.
I’m thinking about creating my own but I’m not sure where to start.
Do you have any ideas or suggestions? Thanks
Here is my homepage … Implants in dentistry
Appreciate the recommendation. Will try it out.
Here is my webpage – http://www.horrorfilmfans.de/birdemic-shock-and-terror/
It’s enormous that you are getting ideas from this article as well
as from our dialogue made at this place.
We absolutely love your blog and find nearly all of your post’s to be what precisely I’m looking for.
Does one offer guest writers to write content available for you?
I wouldn’t mind creating a post or elaborating on a lot of the
subjects you write regarding here. Again, awesome web log!
Feel free to visit my site http://www.studium-berater.de/kostenloses-girokonto-fuer-studenten/
When someone writes an article he/she maintains
the idea of a user in his/her mind that how a user can understand it.
Therefore that’s why this piece of writing is perfect. Thanks!
This is a topic that’s close to my heart… Many thanks! Where are your contact details though?
What’s up, of course this piece of writing is actually fastidious
and I have learned lot of things from it concerning
blogging. thanks.
Here is my web site: Virtual office Brisbane
What’s up to every body, it’s my first pay a visit of this web site; this weblog carries amazing
and in fact excellent data designed for readers.
Stop by my homepage: Surry Hills Brothel
Hi there, I enjoy reading through your article.
I like to write a little comment to support you.
Also visit my web-site :: arthritis
Ahaa, its pleasant conversation regarding this piece of writing here at this web site, I have
read all that, so now me also commenting here.
Also visit my weblog :: treatment for herpes outbreak
If you are going for finest contents like myself,
only visit this web site daily as it gives quality contents, thanks
Look at my page escort Lucca
Do you have any video of that? I’d care to find out some additional information.
Also visit my web page – swimming technique tips
you’re in point of fact a good webmaster. The site
loading speed is amazing. It sort of feels that you are doing any distinctive trick.
In addition, The contents are masterpiece. you have performed a great process on this matter!
Feel free to visit my site – Green Cofe Turbo Funciona?
Oh my goodness! Incredible article dude! Thank you
so much, However I am experiencing problems with your RSS.
I don’t know the reason why I can’t join it. Is there anybody
else having identical RSS problems? Anyone who knows the solution can you kindly respond?
Thanx!!
Also visit my web page: reparacion pequeños electrodomesticoscalle libertad
I am sure this paragraph has touched all the internet visitors,
its really really pleasant post on building up new blog.
Also visit my site: indian bike reviews by experts
Greetings, I do think your site might be having web browser compatibility problems.
Whenever I look at your web site in Safari, it looks fine however, when opening in I.E., it’s got some overlapping
issues. I just wanted to give you a quick heads up! Other
than that, excellent website!
My web site … DOT compliance seminar
This excellent website really has all of the information I needed about this subject and didn’t know who to ask.
My website; Internet Marketing
I’m extremely inspired together with your writing skills
as smartly as with the layout in your blog.
Is that this a paid subject matter or did you modify it yourself?
Either way keep up the excellent high quality writing,
it is uncommon to look a great blog like this one today..
Also visit my web-site: judi online bola
Oh my goodness! Awesome article dude! Many thanks, However I am having troubles with your RSS.
I don’t understand the reason why I can’t join it.
Is there anybody else getting similar RSS issues? Anyone that knows the answer will you kindly respond?
Thanx!!
Feel free to surf to my blog – Snatch grip deadlift benefit
This is really attention-grabbing, You’re an excessively skilled blogger.
I have joined your rss feed and look ahead to searching
for more of your magnificent post. Additionally, I’ve shared your web site in my social
networks
my weblog … Röstergilde
Amazing things here. I am very happy to see your article.
Thanks so much and I’m looking forward to contact
you. Will you kindly drop me a e-mail?
Feel free to visit my blog :: iphone screen repair miami
Highly energetic blog, I enjoyed that bit. Will there be
a part 2?
my web page – reparacion electrodomesticos aeg
I really like your blog.. very nice colors & theme.
Did you design this website yourself or did you hire someone
to do it for you? Plz respond as I’m looking to design my own blog
and would like to know where u got this from. thanks
my site: Gastronomy Travel
Way cool! Some extremely valid points! I appreciate you penning this article plus the rest of the site is extremely good.
Feel free to surf to my web blog; swimming technique tips
It’s amazing to pay a quick visit this web site
and reading the views of all mates concerning this article,
while I am also zealous of getting experience.
Stop by my web site – eleanorejanice.magnoto.de (Anneliese)
I think the admmin of this webb page is really working hard in favor
off his site, as here every data is quality based information.
Here is my web site; Swimming free betting bonus
Compared to the sexy and delicate halter wedding gowns, the
ball gown wedding dress seems a tad conservative. This made the blinds hang
haphazardly, thus the room looked messier. Pear Shaped
Figure- A-line dress with empire waists and straight cut
is ideal for this body shape as it lengthens
the torso and legs. After two people have been in a committed relationship for a while dressing alike will occur.
Choose an embellished top for a glamorous, sparkled look that.
Usually, couples would’ve to walk inside and out from one
boutique to the next in search of the best bridesmaid
dress Brisbane.
Also visit my web-site dresses
Excellent beat ! I would like to apprentice while you amend your website, how could i subscribe for a blog web site?
The account aided me a applicable deal. I had been a little bit acquainted of this your broadcast
provided shiny transparent concept